C++基础入门
1 C++初识别
1.1 第一个C++程序
编写一个C++程序总共分为4个步骤:
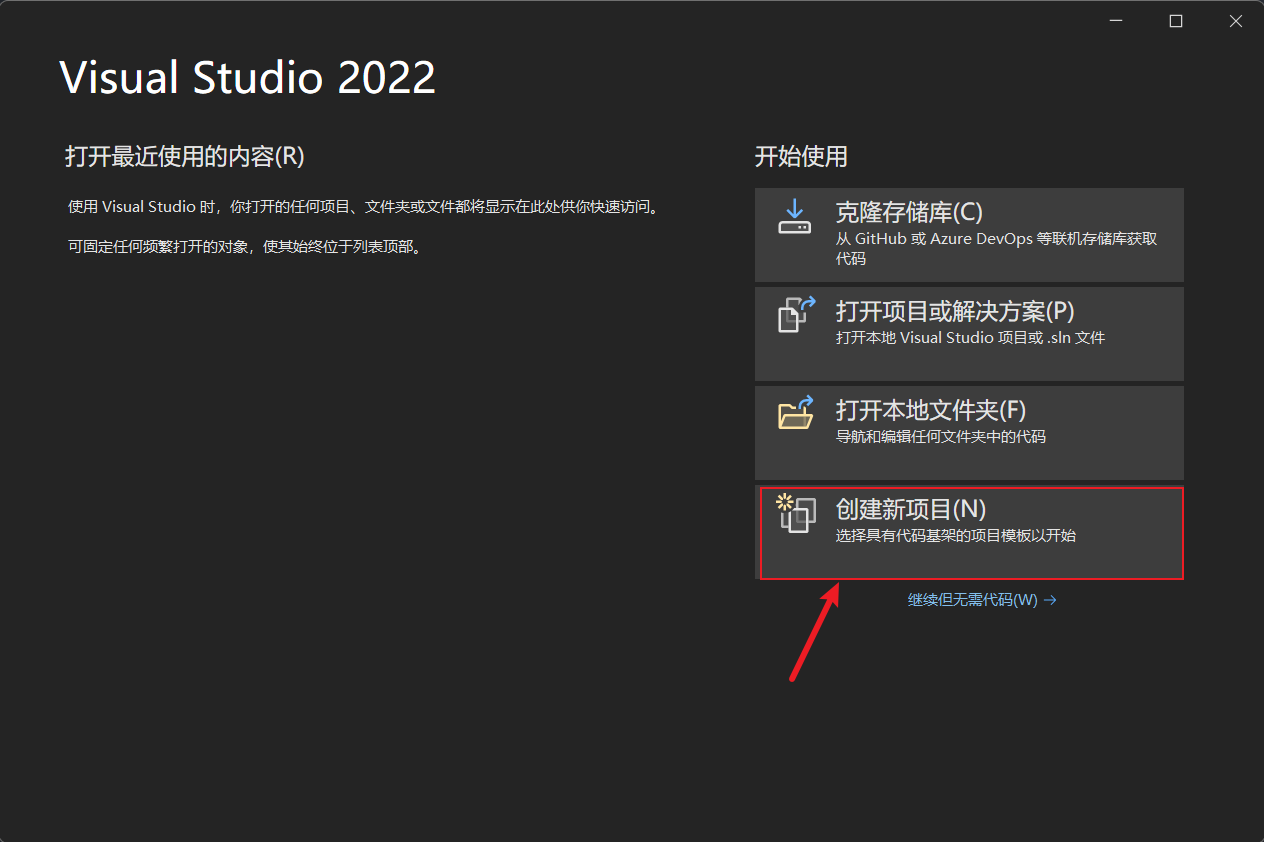
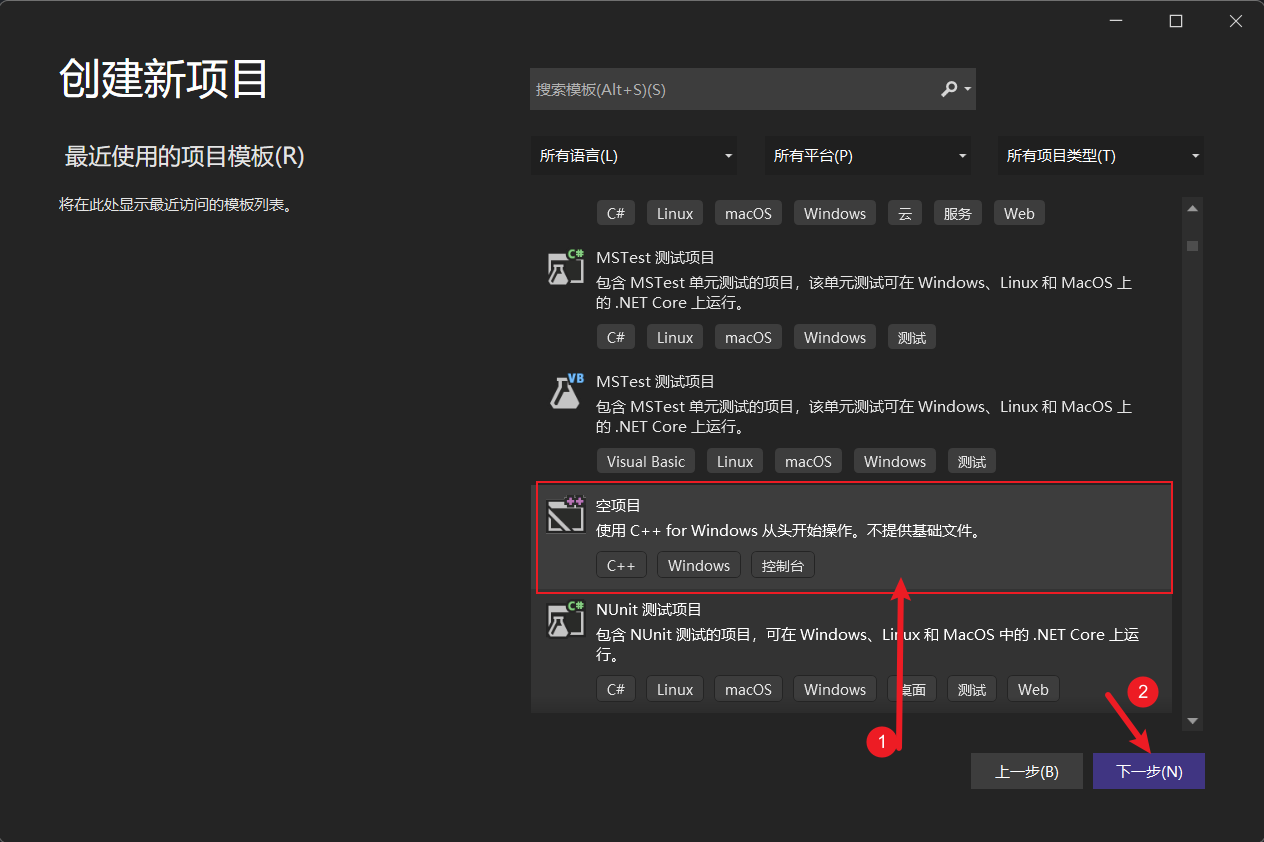
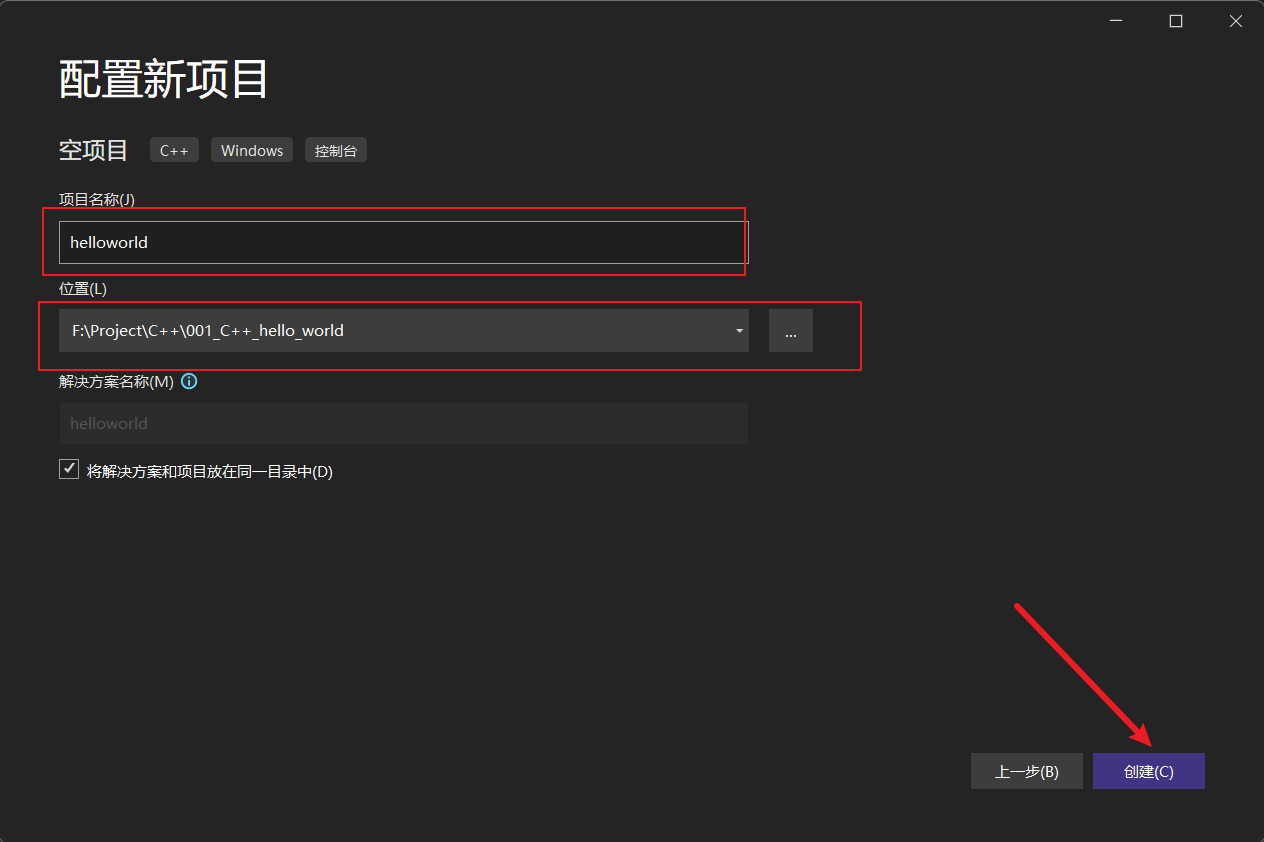
1.1.1 创建项目
Visual Studio是我们用来编写C++程序的主要工具,我们先将它打开
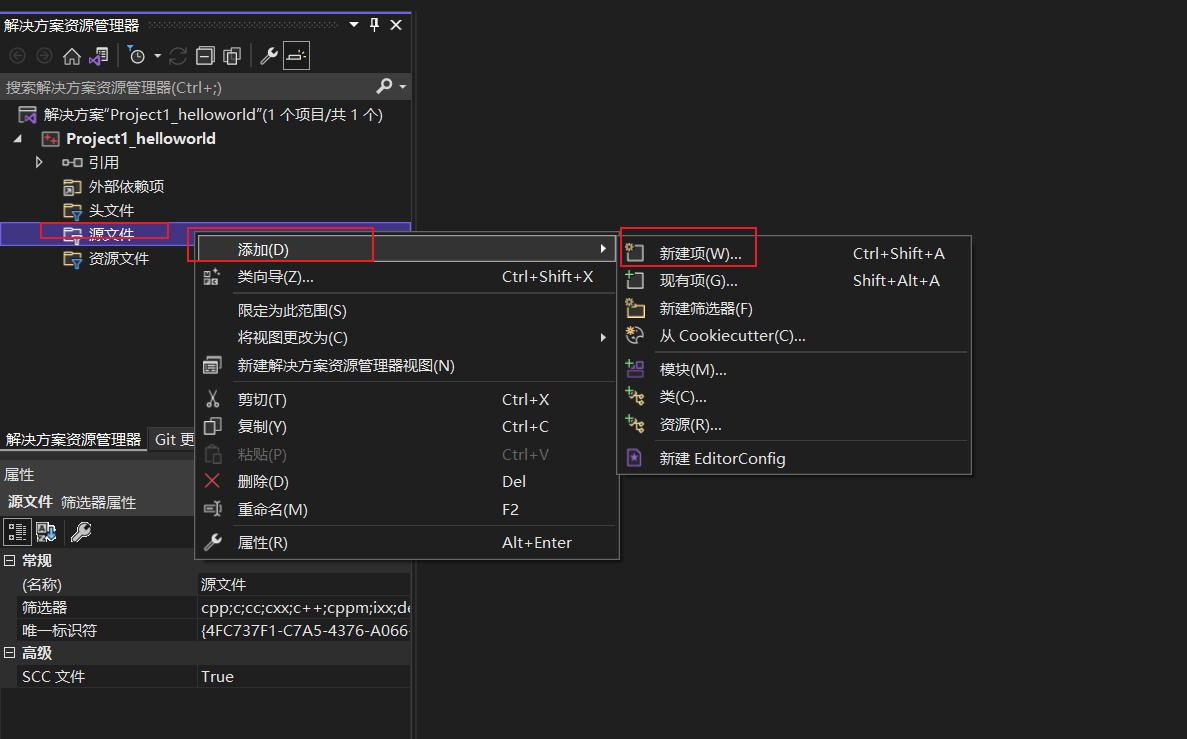
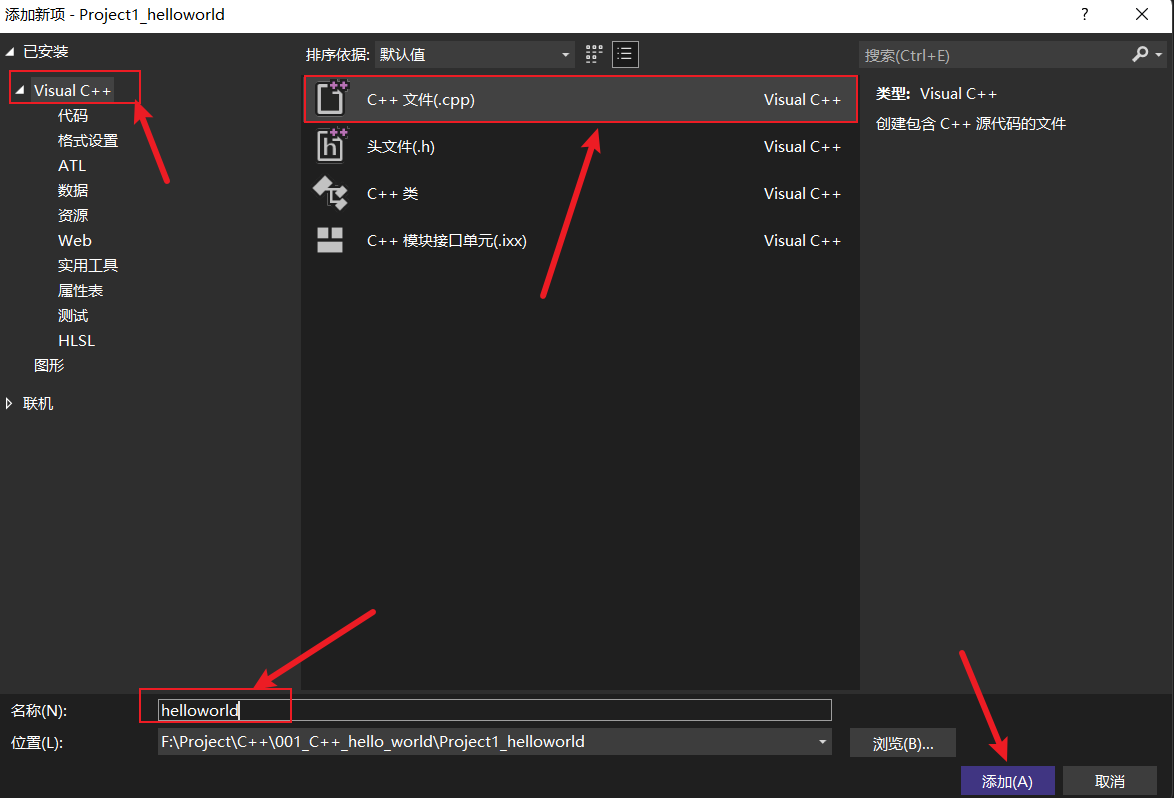
1.1.2 创建文件
右键源文件,选择添加->新建项
给C++文件起个名称,然后点击添加即可。
1.1.3 编写代码
1 2 3 4 5 6 7 8 9 10 #include <iostream> using namespace std;int main () cout << "hello C++" << endl; system ("pause" ); return 0 ; }
1.2 注释
作用 :在代码中加一些说明和解释,方便自己或其他程序员阅读代码
两种格式 :
单行注释 ://描述信息
通常放在一行代码的上方,或者一条语句的末尾,对改行代码说明
多行注释 :/* 描述信息 */
提示:编译器在编译代码时,会忽略注释的内容
1 2 3 4 5 6 7 8 9 10 11 12 13 #include <iostream> using namespace std;int main () cout << "hello C++" << endl; system ("pause" ); return 0 ; }
1.3 变量
作用 :给一段指定的内存空间起名,方便操作这段内存
语法 :数据类型 变量名 = 初始值;
示例 :
1 2 3 4 5 6 7 8 9 10 11 #include <iostream> using namespace std;int main () int a = 10 ; cout << "a = " << a << endl; system ("pause" ); return 0 ; }
1.4 常量
作用 :用于记录程序中不可更改的数据
C++定义常量两种方式
#define 宏常量:#define 常量名 常量值
==通常在文件上方定义==,表示一个常量,==不可修改==。
const 修饰的变量:const 数据类型 常量名 = 常量值
==通常在变量定义前加关键字==,修饰该变量为常量,==不可修改==。
示例:
1 2 3 4 5 6 7 8 9 10 11 12 13 14 15 16 #include <iostream> using namespace std;#define day 7 int main () const int month=12 ; cout << "一周共有" << day << "天" << endl; cout << "一年共有" << month << "个月" << endl; system ("pause" ); return 0 ; }
1.5 关键字
作用 :关键字是C++中预先保留的单词(标识符)
C++关键字如下:
asm
do
if
return
typedef
auto
double
inline
short
typeid
bool
dynamic_cast
int
signed
typename
break
else
long
sizeof
union
case
enum
mutable
static
unsigned
catch
explicit
namespace
static_cast
using
char
export
new
struct
virtual
class
extern
operator
switch
void
const
false
private
template
volatile
const_cast
float
protected
this
wchar_t
continue
for
public
throw
while
default
friend
register
true
delete
goto
reinterpret_cast
try
==提示:在给变量或者常量起名称的时候,不要用C++的关键字,否则会产生歧义==。
1.6 标识符命名规则
作用 :C++规定给标识符(变量、常量)命名时,有一套自己的规则
标识符不能是关键字
标识符只能由字母、数字、下划线组成
第一个字符必须为字母或下划线
标识符中字母区分大小写
建议:给标识符命名时,争取做到见名知意的效果,方便自己和他人的阅读。
1 2 3 4 5 6 7 8 9 10 11 12 13 14 15 16 17 #include <iostream> using namespace std;int main () int abc = 10 ; int _abc = 20 ; int _12aa = 30 ; cout << abc << endl; cout << _abc << endl; cout << _12aa << endl; system ("pause" ); return 0 ; }
2 数据类型
C++规定在创建一个变量或者常量时,必须要指定出相应的数据类型,否则无法给变量分配内存。
2.1 整型
作用 :整型变量表示的是==整数类型==的数据。
C++中能够表示整型的类型有以下几种方式,区别在于所占内存空间不同 :
数据类型
占用空间
取值范围
short(短整型)
2字节
(-2^15^ ~ 2^15^-1)
int(整型)
4字节
(-2^31^ ~ 2^31^-1)
long(长整型)
Windows为4字节,Linux为4字节(32位),8字节(64位)
(-2^31^ ~ 2^31^-1)
long long(长长整型)
8字节
(-2^63^ ~ 2^63^-1)
1 2 3 4 5 6 7 8 9 10 11 12 13 14 15 16 17 18 19 20 #include <iostream> using namespace std;int main () short num1 = 10 ; int num2 = 20 ; long num3 = 30 ; long long num4 = 40 ; cout << "num1 = " << num1 << endl; cout << "num2 = " << num2 << endl; cout << "num3 = " << num3 << endl; cout << "num4 = " << num4 << endl; system ("pause" ); return 0 ; }
2.2 sizeof关键字
作用 :利用sizeof关键字可以统计数据类型所占内存大小
语法 :sizeof( 数据类型 / 变量 )
示例 :
1 2 3 4 5 6 7 8 9 10 11 12 13 14 15 16 17 18 19 20 21 #include <iostream> using namespace std;int main () short num1 = 10 ; int num2 = 20 ; long num3 = 30 ; long long num4 = 40 ; cout << "short 类型所占内存空间为: " << sizeof (num1) << endl; cout << "int 类型所占内存空间为: " << sizeof (short ) << endl; cout << "int 类型所占内存空间为: " << sizeof (num2) << endl; cout << "long 类型所占内存空间为: " << sizeof (num3) << endl; cout << "long long 类型所占内存空间为: " << sizeof (num4) << endl; system ("pause" ); return 0 ; }
整型结论:==short < int <= long <= long long==
2.3 实型
作用 :用于==表示小数==
浮点型变量分为两种:
单精度float
双精度double
两者的区别 在于表示的有效数字范围不同。
数据类型
占用空间
有效数字范围
float
4字节
7位有效数字
double
8字节
15~16位有效数字
示例 :
1 2 3 4 5 6 7 8 9 10 11 12 13 14 15 16 17 18 19 20 21 22 #include <iostream> using namespace std;int main () float f1 = 3.14f ; double d1 = 3.14 ; float f2 = 3e2 ; float f3 = 3e-2 ; cout << "f1 = " << f1 << endl; cout << "d1 = " << d1 << endl; cout << "f2 = " << f2 << endl; cout << "f3 = " << f3 << endl; system ("pause" ); return 0 ; }
2.4 字符型
作用 :字符型变量用于显示单个字符
语法 :char ch = 'a';
注意:
在显示字符型变量时,用单引号将字符括起来,不要用双引号
单引号只能有一个字符,不可以是字符串
C和C++中字符型变量只占用==1个字节==。
字符型变量并不是把字符本身放到内存中存储,而是将对应的ASCII编码放入到存储单元。
示例:
1 2 3 4 5 6 7 8 9 10 11 12 13 14 15 16 17 18 19 20 21 22 #include <iostream> using namespace std;int main () char ch = 'a' ; cout << ch << endl; cout << "char字符型变量所占内存:" << sizeof (char ) << endl; cout << (int )ch << endl; system ("pause" ); return 0 ; }
ASCII码表格:
ASCII值
控制字符
ASCII值
字符
ASCII值
字符
ASCII值
字符
0
NUT
32
(space)
64
@
96
、
1
SOH
33
!
65
A
97
a
2
STX
34
“
66
B
98
b
3
ETX
35
#
67
C
99
c
4
EOT
36
$
68
D
100
d
5
ENQ
37
%
69
E
101
e
6
ACK
38
&
70
F
102
f
7
BEL
39
‘
71
G
103
g
8
BS
40
(
72
H
104
h
9
HT
41
)
73
I
105
i
10
LF
42
*
74
J
106
j
11
VT
43
+
75
K
107
k
12
FF
44
,
76
L
108
l
13
CR
45
-
77
M
109
m
14
SO
46
.
78
N
110
n
15
SI
47
/
79
O
111
o
16
DLE
48
0
80
P
112
p
17
DCI
49
1
81
Q
113
q
18
DC2
50
2
82
R
114
r
19
DC3
51
3
83
S
115
s
20
DC4
52
4
84
T
116
t
21
NAK
53
5
85
U
117
u
22
SYN
54
6
86
V
118
v
23
TB
55
7
87
W
119
w
24
CAN
56
8
88
X
120
x
25
EM
57
9
89
Y
121
y
26
SUB
58
:
90
Z
122
z
27
ESC
59
;
91
[
123
{
28
FS
60
<
92
/
124
|
29
GS
61
=
93
]
125
}
30
RS
62
>
94
^
126
`
31
US
63
?
95
_
127
DEL
ASCII码大致由以下两部分 组成:
ASCII非打印控制字符:ASCII表上的数字0-31分配给了控制字符,用于控制像打印机等一些外围设备。
ASCII打印字符:数字32-126分配给了能在键盘上找到的字符,当查看或打印文档时就会出现。
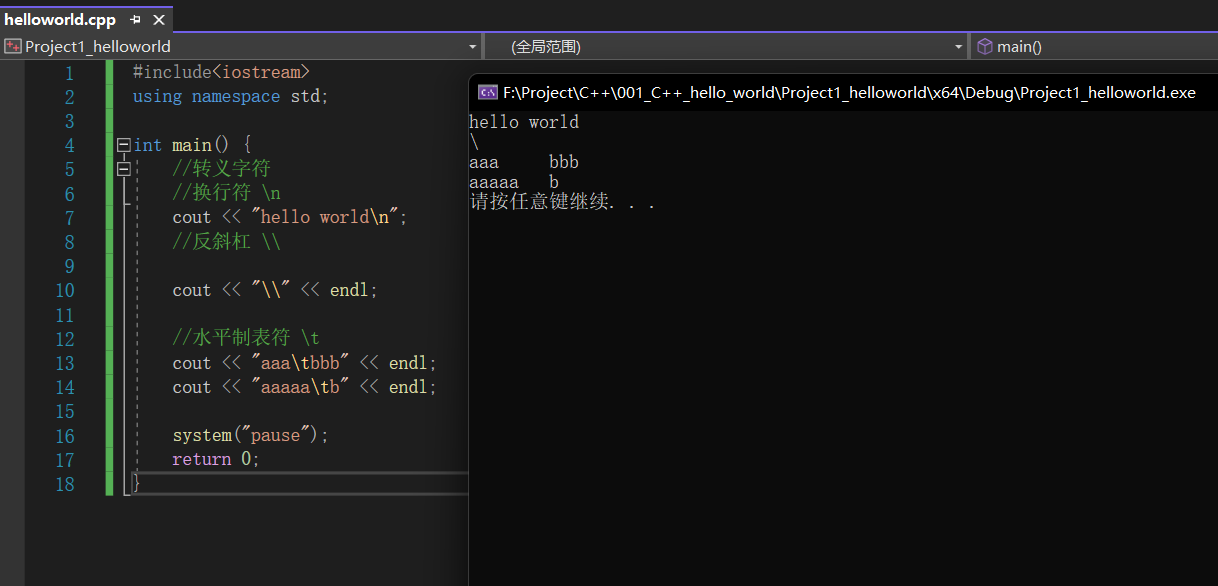
2.5 转义字符
作用 :用于表示一些==不能显示出来的ASCII字符==。
现阶段我们常用的转义字符有:\n \\ \t
转义字符
含义
ASCII码值(十进制)
\a警报
007
\b退格(BS),将当前位置移到前一列
008
\f换页(FF),将当前位置移到下页开头
012
\n换行(LF),将当前位置移到下一行开头
010
\r回车(CR),将当前位置移到本行开头
013
\t水平制表(HT)(跳到下一个TAB位置)
009
\v垂直制表(VT)
011
\\代表一个反斜线字符”\“
092
\'代表一个单引号(撇号)字符
039
\"代表一个双引号字符
034
\?代表一个问号
063
\0数字0
000
\ddd1到3位八进制数所代表的任意字符
三位八进制
\xhh十六进制所代表的任意字符
十六进制
示例:
1 2 3 4 5 6 7 8 9 10 11 12 13 14 15 16 17 18 #include <iostream> using namespace std;int main () cout << "hello world\n" ; cout << "\\" << endl; cout << "aaa\tbbb" << endl; cout << "aaaaa\tb" << endl; system ("pause" ); return 0 ; }
2.6 字符串型
作用 :用于表示一串字符
两种风格
C风格字符串 :char 变量名[] = "字符串值"
示例:
1 2 3 4 5 6 7 8 9 10 11 #include <iostream> using namespace std;int main () char str1[] = "hello world" ; cout << str1 << endl; system ("pause" ); return 0 ; }
注意:C风格的字符串要用双引号括起来
C++风格字符串 :string 变量名 = "字符串值"
示例:
1 2 3 4 5 6 7 8 9 10 11 12 #include <iostream> using namespace std;#include <string> int main () string str1 = "hello world" ; cout << str1 << endl; system ("pause" ); return 0 ; }
2.7 布尔类型bool
作用 :布尔数据类型代表真或假的值
bool类型只有两个值:
true — 真(本质是1)
false — 假(本质是0)
bool类型占==1个字节==大小
示例:
1 2 3 4 5 6 7 8 9 10 11 12 13 14 15 16 17 18 #include <iostream> using namespace std;int main () bool flag = true ; cout << flag << endl; flag = false ; cout << flag << endl; cout << "bool类型所占内存空间:" << sizeof (bool ) << endl; system ("pause" ); return 0 ; }
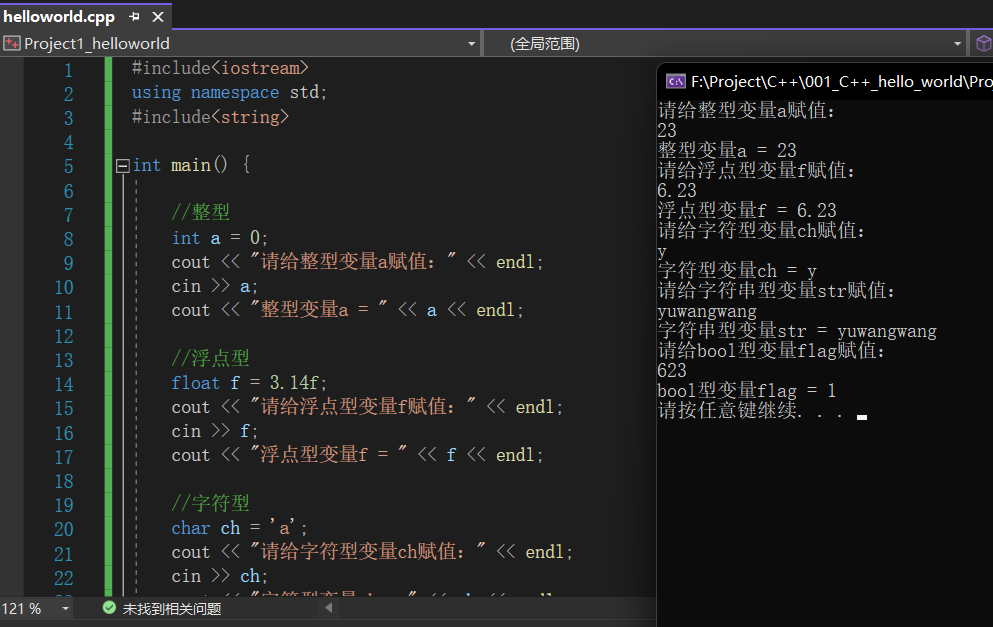
2.8 数据的输入
作用 :用于从键盘获取数据
关键字 :cin
语法 :cin >> 变量
示例:
1 2 3 4 5 6 7 8 9 10 11 12 13 14 15 16 17 18 19 20 21 22 23 24 25 26 27 28 29 30 31 32 33 34 35 36 37 38 39 #include <iostream> using namespace std;#include <string> int main () int a = 0 ; cout << "请给整型变量a赋值:" << endl; cin >> a; cout << "整型变量a = " << a << endl; float f = 3.14f ; cout << "请给浮点型变量f赋值:" << endl; cin >> f; cout << "浮点型变量f = " << f << endl; char ch = 'a' ; cout << "请给字符型变量ch赋值:" << endl; cin >> ch; cout << "字符型变量ch = " << ch << endl; string str = "hello" ; cout << "请给字符串型变量str赋值:" << endl; cin >> str; cout << "字符串型变量str = " << str << endl; bool flag = false ; cout << "请给bool型变量flag赋值:" << endl; cin >> flag; cout << "bool型变量flag = " << flag << endl; system ("pause" ); return 0 ; }
3 运算符
作用 :用于执行代码的运算
本章我们主要讲解以下几类运算符:
运算符类型
作用
算术运算符
用于处理四则运算
赋值运算符
用于将表达式的值赋给变量
比较运算符
用于表达式的比较,并返回一个真值或假值
逻辑运算符
用于根据表达式的值返回真值或假值
3.1 算术运算符
作用 :用于处理四则运算
算术运算符包括以下符号:
运算符
术语
示例
结果
+
正号
+3
3
-
负号
-3
-3
+
加
10+5
15
-
减
10-5
5
*
乘
10*5
50
/
除
10/5
2
%
取模(取余)
10%3
1
++
前置递增
a=2;b=++a;
a=3;b=3;
++
后置递增
a=2;b=a++;
a=3;b=2;
–
前置递减
a=2;b=–a;
a=1;b=1;
–
后置递减
a=2;b=a–;
a=1;b=2;
示例:
1 2 3 4 5 6 7 8 9 10 11 12 13 14 15 16 17 18 #include <iostream> using namespace std;int main () int a1 = 10 ; int b1 = 3 ; cout << a1 + b1 << endl; cout << a1 - b1 << endl; cout << a1 * b1 << endl; cout << a1 / b1 << endl; cout << a1 % b1 << endl; system ("pause" ); return 0 ; }
注意:两个==小数==是不可以做取余运算的
示例:
1 2 3 4 5 6 7 8 9 10 11 12 13 14 15 16 17 18 19 20 21 22 23 24 25 26 27 28 29 30 31 #include <iostream> using namespace std;int main () int a = 10 ; ++a; cout << "a = " << a << endl; int b = 10 ; b++; cout << "b = " << b << endl; int a2 = 10 ; int b2 = ++a2*10 ; cout << "a2 = " << a2 << endl; cout << "b2 = " << b2 << endl; int a3 = 10 ; int b3 = a3++ * 10 ; cout << "a3 = " << a3 << endl; cout << "b3 = " << b3 << endl; system ("pause" ); return 0 ; }
总结:前置递增先对变量进行++,再计算表达式,后置递增相反。
3.2 赋值运算符
作用 :用于将表达式的值赋给变量
赋值运算符包括以下几个符号:
运算符
术语
示例
结果
=
赋值
a=2;b=3;
a=2;b=3;
;+=
加等于
a=0;a+=2;
a=2;
-=
减等于
a=5;a-=3;
a=2;
*=
乘等于
a=2;a*=2;
a=4;
/=
除等于
a=4;a/=2;
a=2;
%=
模等于
a=3;a%2;
a=1;
示例:
1 2 3 4 5 6 7 8 9 10 11 12 13 14 15 16 17 18 19 20 21 22 23 24 25 26 27 28 29 30 31 32 33 34 35 36 37 38 39 #include <iostream> using namespace std;int main () int a = 10 ; a = 100 ; cout << "a = " << a << endl; a = 10 ; a += 2 ; cout << "a = " << a << endl; a = 10 ; a -= 2 ; cout << "a = " << a << endl; a = 10 ; a *= 2 ; cout << "a = " << a << endl; a = 10 ; a /= 2 ; cout << "a = " << a << endl; a = 10 ; a %= 2 ; cout << "a = " << a << endl; system ("pause" ); return 0 ; }
3.3 比较运算符
作用 :用于表达式的比较,并返回一个真值或假值
比较运算符有以下符号:
运算符
术语
示例
结果
==
相等于
4==3
0
!=
不等于
4!=3
1
<
小于
4<3
0
>
大于
4>3
1
<=
小于等于
4<=3
0
>=
大于等于
4>=1
1
示例:
1 2 3 4 5 6 7 8 9 10 11 12 13 14 15 16 17 18 19 20 21 22 23 #include <iostream> using namespace std;int main () int a = 10 ; int b = 20 ; cout << (a == b) << endl; cout << (a != b) << endl; cout << (a > b) << endl; cout << (a < b) << endl; cout << (a >= b) << endl; cout << (a <= b) << endl; system ("pause" ); return 0 ; }
3.4 逻辑运算符
作用 :用于根据表达式的值返回真值或假值
逻辑运算符有以下符号:
运算符
术语
示例
结果
!
非
!a
如果a为假,则!a为真;如果a为真,则!a为假。
&&
与
a && b
如果a和b都为真,则结果为真,否则为假。
||
或
a || b
如果a和b有一个为真,则结果为真,二者都为假时,结果为假。
示例1:
1 2 3 4 5 6 7 8 9 10 11 12 13 14 15 16 17 18 #include <iostream> using namespace std;int main () int a = 10 ; int b = 0 ; cout << !a << endl; cout << !!a << endl; cout << (a && b) << endl; cout << (a || b) << endl; cout << (!a || b) << endl; cout << (a && !b) << endl; system ("pause" ); return 0 ; }
总结:
逻辑非:真变假,假变真
逻辑与:同真为真,其余为假
逻辑或:同假为假,其余为真
4 程序流程结构
C/C++支持最基本的三种程序运行结构:顺序结构、选择结构、循环结构
顺序结构:程序按顺序执行,不发生跳转
选择结构:依据条件是否满足,有选择的执行相应功能
循环结构:依据条件是否满足,循环多次执行某段代码
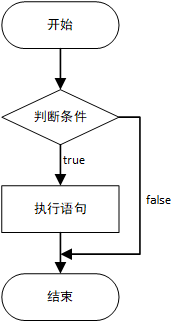
4.1 选择结构
4.1.1 if 语句
作用 :执行满足条件的语句
if语句的三种形式
单行格式if语句
多行格式if语句
多条件的if语句
单行格式if语句:if(条件){ 条件满足执行的语句 }
示例:
1 2 3 4 5 6 7 8 9 10 11 12 13 14 15 16 17 #include <iostream> using namespace std;int main () int score; cout << "请输入您的分数:" << endl; cin >> score; cout << "您输入的分数为:" << score << endl; if (score > 600 ) { cout << "恭喜您考上了" << endl; } system ("pause" ); return 0 ; }
注意:if条件表达式后不要加分号
多行格式if语句:if(条件){ 条件满足执行的语句 }else{ 条件不满足执行的语句 }
示例:
1 2 3 4 5 6 7 8 9 10 11 12 13 14 15 16 17 18 19 20 #include <iostream> using namespace std;int main () int score; cout << "请输入您的分数:" << endl; cin >> score; cout << "您输入的分数为:" << score << endl; if (score > 600 ) { cout << "恭喜您考上了" << endl; } else { cout << "很遗憾,您未考上" << endl; } system ("pause" ); return 0 ; }
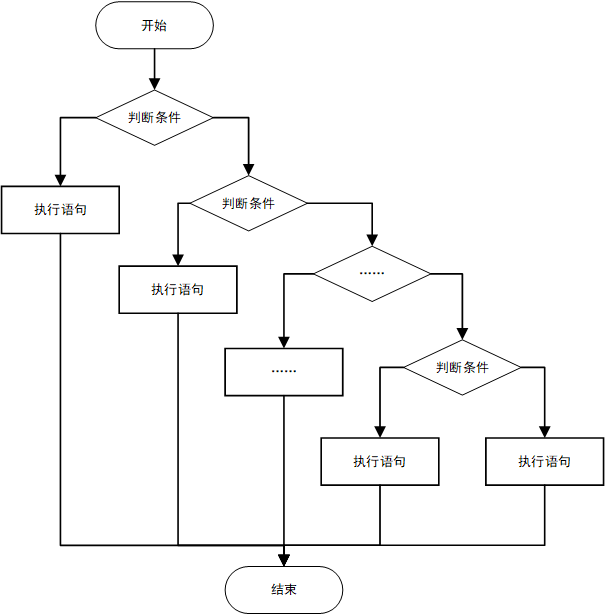
多条件的if语句:if(条件1){ 条件1满足执行的语句 }else if(条件2){ 条件2满足执行的语句 }... else{ 都不满足执行的语句 }
1 2 3 4 5 6 7 8 9 10 11 12 13 14 15 16 17 18 19 20 21 22 23 24 25 26 #include <iostream> using namespace std;int main () int score; cout << "请输入您的分数:" << endl; cin >> score; cout << "您输入的分数为:" << score << endl; if (score > 600 ) { cout << "恭喜您考上了一本" << endl; } else if (score > 500 ) { cout << "恭喜您考上了二本" << endl; } else if (score > 400 ) { cout << "恭喜您考上了三本" << endl; } else { cout << "很遗憾,您没有考上。" << endl; } system ("pause" ); return 0 ; }
嵌套if语句 :在if语句中,可以嵌套使用if语句,达到更精确的条件判断
案例需求:
提示用户输入一个高考考试分数,根据分数做如下判断;
分数如果大于600分视为考上一本,大于500分考上二本,大于400分考上三本,其余视为未考上本科;
在一本分数中,如果大于700分,考入北大,大于680分,考入清华,大于660分考入人大。
示例:
1 2 3 4 5 6 7 8 9 10 11 12 13 14 15 16 17 18 19 20 21 22 23 24 25 26 27 28 29 30 31 32 33 34 35 #include <iostream> using namespace std;int main () int score; cout << "请输入您的分数:" << endl; cin >> score; cout << "您输入的分数为:" << score << endl; if (score > 600 ) { cout << "恭喜您考上了一本!" << endl; if (score > 700 ) { cout << "恭喜您考上了北大!" << endl; } else if (score > 680 ) { cout << "恭喜您考上了清华!" << endl; } else if (score > 660 ) { cout << "恭喜您考上了人大!" << endl; } } else if (score > 500 ) { cout << "恭喜您考上了二本!" << endl; } else if (score > 400 ) { cout << "恭喜您考上了三本!" << endl; } else { cout << "很遗憾,您没有考上。" << endl; } system ("pause" ); return 0 ; }
4.1.2 三目运算符
作用 :通过三目运算符实现简单的判断
语法 :表达式1 ? 表达式2 : 表达式3
解释 :
如果表达式1的值为真,执行表达式2,并返回表达式2的结果;
如果表达式1的值为假,执行表达式3,并返回表达式3的结果;
示例:
1 2 3 4 5 6 7 8 9 10 11 12 13 14 15 16 17 18 19 20 21 22 23 24 #include <iostream> using namespace std;int main () int a ,b, c; cout << "请输入a,b,c的值" << endl; cin >> a; cin >> b; cin >> c; cout << "输入a,b,c的值分别为:" <<a<<" " << b << " " << c << endl; c = (a > b ? a:b); cout << "c 的值为 " << c << endl; (a > b ? a : b) = 100 ; cout << "a和b的值分别为 " << a << " " << b << endl; system ("pause" ); return 0 ; }
注意:在C++中三目运算符返回的是==变量==,可以继续进行赋值
4.1.3 switch 语句
作用 :执行多条件分支语句
语法 :
1
2
3
4
5
6
switch (表达式){ case 结果1 : 执行语句;break ; case 结果2 : 执行语句;break ; ... default :执行语句;break ; }
示例:
1 2 3 4 5 6 7 8 9 10 11 12 13 14 15 16 17 18 19 20 21 22 23 24 25 26 27 28 29 30 31 32 33 34 35 36 37 38 39 40 #include <iostream> using namespace std;int main () int score; cout << "请给电影打分:" << endl; cin >> score; cout << "您给电影打的分为:" << score << endl; switch (score) { case 10 : cout << "您认为是经典电影!" << endl; break ; case 9 : cout << "您认为是经典电影!" << endl; break ; case 8 : cout << "您认为电影非常好!" << endl; break ; case 7 : cout << "您认为电影非常好!" << endl; break ; case 6 : cout << "您认为电影一般!" << endl; break ; case 5 : cout << "您认为电影一般!" << endl; break ; default : cout << "您认为电影很烂!" << endl; break ; } system ("pause" ); return 0 ; }
注意:
switch语句中表达式类型只能是整型或者字符型;
case里如果没有break,那么程序会一直向下执行。
总结:与if语句比,对于多条件判断时,switch的结构清晰,执行效率高,缺点是switch不可以判断区间。
4.2 循环结构
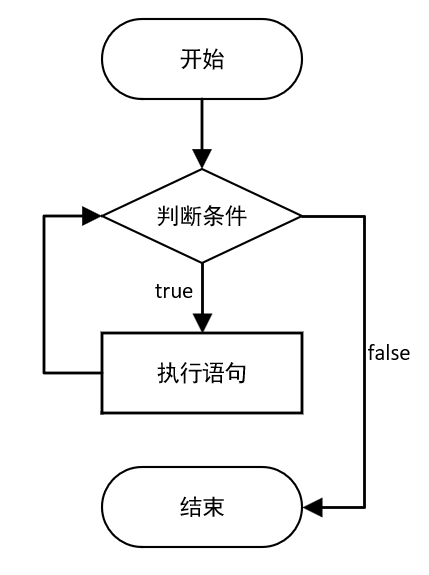
4.2.1 while循环语句
作用 :满足循环条件,执行循环语句
语法 :while(循环条件){ 循环语句 }
解释 :只要循环条件的结果为真,就执行循环语句
示例:
1 2 3 4 5 6 7 8 9 10 11 12 13 14 15 #include <iostream> using namespace std;int main () int num = 0 ; while (num<10 ) { cout << "num = " << num << endl; num++; } system ("pause" ); return 0 ; }
注意:在执行循环语句的时候,程序必须提供跳出循环的出口,否则出现死循环。
while循环案例 :猜数字
1 2 3 4 5 6 7 8 9 10 11 12 13 14 15 16 17 18 19 20 21 22 23 24 25 #include <iostream> using namespace std;#include <ctime> int main () srand ((unsigned int )time (NULL )); int randnum = rand () % 100 + 1 ; int value; cout << "请猜一个整数:" << randnum << endl; cin >> value; while (value != randnum) { if (value > randnum) cout << "输入的值大于随机数,请重新输入:" << endl; else cout << "输入的值小于随机数,请重新输入:" << endl; cin >> value; } cout << "恭喜您猜中随机数:" << value << endl; system ("pause" ); return 0 ; }
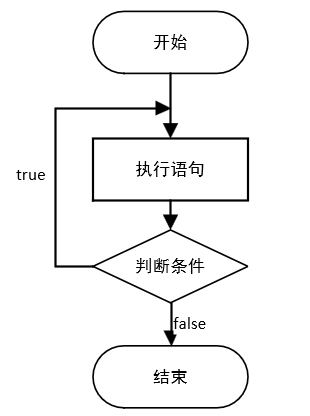
4.2.2 do…while循环语句
作用 :满足循环条件,执行循环语句
语法 :do{ 循环语句 } while( 循环条件 );
注意 :与while的区别在于do…while会先执行一次循环语句,再判断循环条件
示例:
1 2 3 4 5 6 7 8 9 10 11 12 13 14 #include <iostream> using namespace std;int main () int num = 0 ; do { cout << "num = " << num << endl; num++; } while (num < 10 ); system ("pause" ); return 0 ; }
总结:与while循环区别在于do…while先执行一次循环语句,再判断循环条件
do…while练习案例 :水仙花数
案例描述:水仙花数是指一个3位数,它的每个位上的数字的3次幂之和等于它本身
例如:1^3 + 5^3 +3^3 = 153
请利用do…while语句,求出所有3位数中的水仙花数
方法一:此程序复杂度较高
1 2 3 4 5 6 7 8 9 10 11 12 13 14 15 16 17 18 19 20 21 22 23 24 25 26 27 #include <iostream> using namespace std;int main () int num1, num2, num3; num1 = 1 ; num2 = 0 ; num3 = 0 ; cout << "水仙花数:" << endl; do { do { do { if ((pow (num1,3 )+ pow (num2,3 )+ pow (num3,3 ))==100 *num1+10 *num2+num3) cout <<num1<< " " << num2 << " " << num3 << endl; num3++; } while (num3 < 10 ); num3 = 0 ; num2++; } while (num2 < 10 ); num2 = 0 ; num1++; } while (num1 < 10 ); system ("pause" ); return 0 ; }
方法二:此程序复杂度低
1 2 3 4 5 6 7 8 9 10 11 12 13 14 15 16 17 18 19 20 #include <iostream> using namespace std;int main () int num, num1, num2, num3; num = 100 ; cout << "水仙花数:" << endl; do { num1 = num / 100 ; num2 = num / 10 % 10 ; num3 = num % 10 ; if ((pow (num1, 3 ) + pow (num2, 3 ) + pow (num3, 3 )) == num) cout << num1 << " " << num2 << " " << num3 << endl; num++; } while (num < 1000 ); system ("pause" ); return 0 ; }
4.2.3 for循环语句
作用 :满足循环条件,执行循环语句
语法 :for(起始表达式;条件表达式;末尾循环体) { 循环语句; }
示例:
1 2 3 4 5 6 7 8 9 10 11 12 13 #include <iostream> using namespace std;int main () int i = 0 ; for (; i < 10 ; i++) { cout << i << endl; } system ("pause" ); return 0 ; }
注意:for循环中的表达式,要用分号进行分割
总结:while,do…while,for都是开发中常用的循环语句,for循环结构比较清晰,比较常规
for循环练习案例 :敲桌子
案例描述:从1开始数到数字100,如果数字个位含有7,或者数字十位含有7,或者该数字是7的倍数,我们打印敲桌子,其余数字直接打印输出
1 2 3 4 5 6 7 8 9 10 11 12 13 14 15 16 17 18 19 #include <iostream> using namespace std;int main () int num1, num2; int i = 0 ; for (; i < 100 ; i++) { num1 = i / 10 ; num2 = i % 10 ; if (num1==7 || num2==7 ||(i % 7 )==0 ) cout << "敲桌子" << endl; else cout << i << endl; } system ("pause" ); return 0 ; }
4.2.4 嵌套循环
作用 :在循环体中再嵌套一层循环,解决一些实际问题
示例:
1 2 3 4 5 6 7 8 9 10 11 12 13 14 15 #include <iostream> using namespace std;int main () int i = 0 ; for (; i < 10 ; i++) { for (int j=0 ;j<10 ;j++) cout << "* " ; cout << endl; } system ("pause" ); return 0 ; }
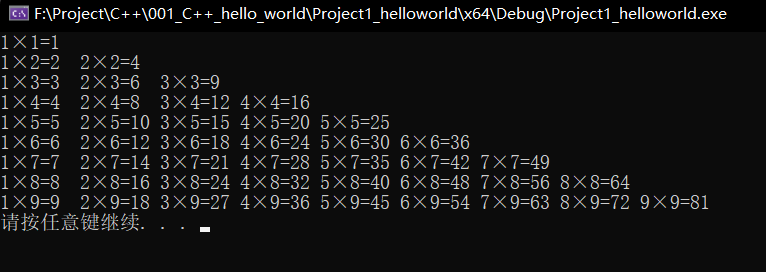
嵌套循环练习案例 :乘法口诀表
案例描述:利用嵌套循环,实现九九乘法表
1 2 3 4 5 6 7 8 9 10 11 12 13 14 15 #include <iostream> using namespace std;int main () int i, j; for (i = 1 ; i < 10 ; i++) { for (j = 1 ; j <= i; j++) cout << j<<"×" <<i<<"=" <<i*j<<"\t" ; cout << endl; } system ("pause" ); return 0 ; }
4.3 跳转语句
4.3.1 break语句
作用 :用于跳出==选择结构==或者==循环结构==
break使用的时机:
出现在switch条件语句中,作用是终止case并跳出switch
出现在循环语句中,作用是跳出当前的循环语句
出现再嵌套循环中,跳出最近的内层循环语句
示例1:break在switch中的使用
1 2 3 4 5 6 7 8 9 10 11 12 13 14 15 16 17 18 19 20 21 22 23 #include <iostream> using namespace std;int main () cout << "选择游戏难度:" << endl; cout << "1、简单" << endl; cout << "2、普通" << endl; cout << "3、困难" << endl; int select; cin >> select; switch (select) { case 1 : cout << "1、简单" << endl; break ; case 2 : cout << "2、普通" << endl; break ; case 3 : cout << "3、困难" << endl; break ; default : break ; } system ("pause" ); return 0 ; }
示例2:break在for循环中的使用
1 2 3 4 5 6 7 8 9 10 11 12 13 14 15 #include <iostream> using namespace std;int main () for (int i = 0 ; i < 10 ; i++) { cout << "i = " << i << endl; if (i == 5 ) { break ; } } system ("pause" ); return 0 ; }
示例3:break在嵌套循环中的使用
1 2 3 4 5 6 7 8 9 10 11 12 13 14 15 16 17 #include <iostream> using namespace std;int main () for (int i = 0 ; i < 10 ; i++) { for (int j = 0 ; j < 10 ; j++) { if (j == 5 ) break ; cout << "* " ; } cout << endl; } system ("pause" ); return 0 ; }
4.3.2 continue语句
作用 :在循环语句中,跳过本次循环中余下尚未执行的语句,继续执行下一次循环
示例 :
1 2 3 4 5 6 7 8 9 10 11 12 13 14 15 16 17 18 19 #include <iostream> using namespace std;int main () for (int i = 0 ; i < 6 ; i++) { cout << "i = " << i << endl; cout << "hello " ; if (i == 3 ) { cout << endl; continue ; } cout << "world" ; cout << endl; } system ("pause" ); return 0 ; }
4.3.3 goto语句
作用 :可以无条件跳转语句。
语法 :goto 标记;
解释 :如果标记的名称存在,执行到goto语句时,会跳转到标记的位置,标记一般用大写。
示例:
1 2 3 4 5 6 7 8 9 10 11 12 13 14 15 16 #include <iostream> using namespace std;int main () cout << "1、xxxx" << endl; cout << "2、xxxx" << endl; goto FLAG; cout << "3、xxxx" << endl; cout << "4、xxxx" << endl; FLAG: cout << "5、xxxx" << endl; system ("pause" ); return 0 ; }
注意:在程序中不建议使用goto语句,以免造成程序流程混乱。
5 数组
5.1 概述
所谓数组,就是一个集合,里面存放了相同类型的数据元素
特点1 :数组中每个数据元素都是相同的数据类型
特点2 :数组是由连续的内存位置组成的
5.2 一维数组
5.2.1 一维数组定义方式
一维数组定义的三种方式:
数据类型 数组名[ 数组长度 ];数据类型 数组名[ 数组长度 ] = { 值1, 值2, ...};数据类型 数组名[ ] = { 值1, 值2, ...};
示例:
1 2 3 4 5 6 7 8 9 10 11 12 13 14 15 #include <iostream> using namespace std;int main () int a[5 ]; int b[5 ] = { 1 ,3 ,6 }; int c[] = { 10 ,20 ,30 ,40 ,50 ,60 }; for (int i = 0 ; i < 5 ; i++) cout << b[i] << endl; for (int i = 0 ; i < 6 ; i++) cout << c[i] << endl; system ("pause" ); return 0 ; }
总结:
数组名的命名规范与变量名命名规范一致,不要和变量重名。
数组中下标是从0开始索引
5.2.2 一维数组数组名
一维数组名称的用途 :
可以统计整个数组在内存中的长度
可以获取数组在内存中的首地址
示例:
1 2 3 4 5 6 7 8 9 10 11 12 13 14 15 16 17 18 19 #include <iostream> using namespace std;int main () int a[10 ] = { 10 ,20 ,30 ,40 ,50 ,60 ,70 ,80 ,90 ,100 }; cout << "整个数组占用内存空间为: " << sizeof (a) << endl; cout << "每个元素占用内存空间为: " << sizeof (a[0 ]) << endl; cout << "数组中元素个数为: " << sizeof (a)/sizeof (a[0 ]) << endl; cout << "数组首地址为: " << a << endl; cout << "数组中中第一个元素首地址为: " << &a[0 ] << endl; cout << "数组中中第二个元素首地址为: " << &a[1 ] << endl; system ("pause" ); return 0 ; }
注意:数组名是常量,不可以修改
练习案例1 :五只小猪称体重
案例描述 :在一个数组中记录了五只小猪的体重,如:int arr[5]={300,350,200,400,250};
找出并打印最重的小猪体重。
1 2 3 4 5 6 7 8 9 10 11 12 13 14 15 16 #include <iostream> using namespace std;int main () int a[5 ] = { 300 ,350 ,200 ,400 ,250 }; int max_v = 0 ; for (int i = 0 ; i < 5 ; i++) { if (a[i] > max_v) max_v = a[i]; } cout << "最重的小猪体重为:" << max_v << endl; system ("pause" ); return 0 ; }
练习案例2 :数组元素逆置
案例描述 :请申明一个5个元素的数组,并且将元素逆置。(如原数组元素为:1,3,2,5,4;逆置后输出结果为:4,5,2,3,1)。
方法一:
1 2 3 4 5 6 7 8 9 10 11 12 13 14 15 16 17 18 19 20 21 22 23 #include <iostream> using namespace std;int main () int a[5 ] = { 1 ,3 ,2 ,5 ,4 }; int b[5 ] = {}; cout << "逆置前的数组值为:" ; for (int i = 0 ; i < 5 ; i++) cout << a[i] << " " ; cout << endl; for (int i = 5 ; i > 0 ; i--) { b[5 - i] = a[i-1 ]; } cout << "逆置后的数组值为:" ; for (int i = 0 ; i < 5 ; i++) cout << b[i] << " " ; cout << endl; system ("pause" ); return 0 ; }
方法二:
1 2 3 4 5 6 7 8 9 10 11 12 13 14 15 16 17 18 19 20 21 22 23 24 25 26 27 28 29 30 31 32 #include <iostream> using namespace std;int main () int a[5 ] = { 1 ,3 ,2 ,5 ,4 }; int start, end, temp; start = 0 ; end = sizeof (a) / sizeof (a[0 ]) - 1 ; cout << "逆置前的数组值为:" ; for (int i = 0 ; i < 5 ; i++) cout << a[i] << " " ; cout << endl; while (start < end) { temp = a[start]; a[start] = a[end]; a[end] = temp; start++; end--; } cout << "逆置后的数组值为:" ; for (int i = 0 ; i < 5 ; i++) cout << a[i] << " " ; cout << endl; system ("pause" ); return 0 ; }
5.2.3 冒泡排序法
作用 :最常用的排序算法,对数组内元素进行排序
比较相邻的元素,如果第一个比第二个大,就交换他们两个;
对每一对相邻元素做同样的工作,执行完毕后,找到第一个最大值;
重复以上的步骤,每次比较次数-1,直到不需要比较。
示例:将数组 {4,2,8,0,5,7,1,3,9} 进行升序排列
1 2 3 4 5 6 7 8 9 10 11 12 13 14 15 16 17 18 19 20 21 22 23 24 25 26 27 28 29 30 31 32 #include <iostream> using namespace std;int main () int a[9 ] = { 4 ,2 ,8 ,0 ,5 ,7 ,1 ,3 ,9 }; int anum, temp; anum = sizeof (a) / sizeof (a[0 ]) - 1 ; cout << "冒泡排序前的数组值为:" ; for (int i = 0 ; i < 9 ; i++) cout << a[i] << " " ; cout << endl; for (int i = 0 ; i < anum; i++) { for (int j = 0 ; j < anum - i; j++) { if (a[j] > a[j + 1 ]) { temp = a[j]; a[j] = a[j + 1 ]; a[j + 1 ] = temp; } } } cout << "逆置后的数组值为:" ; for (int i = 0 ; i < 9 ; i++) cout << a[i] << " " ; cout << endl; system ("pause" ); return 0 ; }
5.3 二维数组
二维数组就是在一维数组上多加一个维度。
5.3.1 二维数组定义方式
二维数组定义的四种方式:
数据类型 数组名[ 行数 ][ 列数 ];数据类型 数组名[ 行数 ][ 列数 ] = { { 数据1 , 数据2 } , { 数据3 , 数据4 } };数据类型 数组名[ 行数 ][ 列数 ] = { 数据1 , 数据2 , 数据3 , 数据4 };数据类型 数组名[ ][ 列数 ] = { 数据1 , 数据2 , 数据3 , 数据4 };
建议:以上四种定义方式,利用第二种更加直观,提高代码的可读性。
示例:
1 2 3 4 5 6 7 8 9 10 11 12 13 14 15 16 17 18 19 20 21 22 23 24 25 26 27 28 29 30 31 32 33 34 35 36 37 38 39 40 41 42 43 44 45 46 47 48 49 50 51 52 53 54 55 56 57 #include <iostream> using namespace std;int main () int arr[2 ][3 ]; arr[0 ][0 ] = 1 ; arr[0 ][1 ] = 2 ; arr[0 ][2 ] = 3 ; arr[1 ][0 ] = 4 ; arr[1 ][1 ] = 5 ; arr[1 ][2 ] = 6 ; int arr2[2 ][3 ] = { {1 ,2 ,3 }, {7 ,8 ,9 } }; int arr3[2 ][3 ] = { 1 ,5 ,3 ,7 ,8 ,9 }; int arr4[][3 ] = { 6 ,5 ,3 ,7 ,4 ,9 }; cout << "数组定义方式一:" << endl; for (int i = 0 ; i < 2 ; i++) { for (int j = 0 ; j < 3 ; j++) { cout << arr[i][j] << " " ; } cout << endl; } cout << "数组定义方式二:" << endl; for (int i = 0 ; i < 2 ; i++) { for (int j = 0 ; j < 3 ; j++) { cout << arr2[i][j] << " " ; } cout << endl; } cout << "数组定义方式三:" << endl; for (int i = 0 ; i < 2 ; i++) { for (int j = 0 ; j < 3 ; j++) { cout << arr3[i][j] << " " ; } cout << endl; } cout << "数组定义方式四:" << endl; for (int i = 0 ; i < 2 ; i++) { for (int j = 0 ; j < 3 ; j++) { cout << arr4[i][j] << " " ; } cout << endl; } system ("pause" ); return 0 ; }
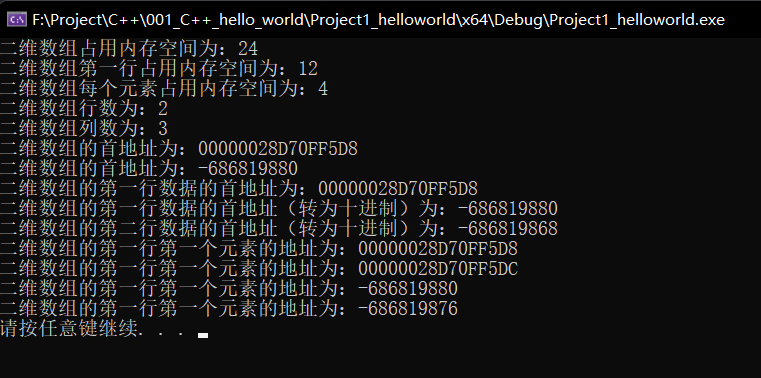
5.3.2 二维数组的名称
示例:
1 2 3 4 5 6 7 8 9 10 11 12 13 14 15 16 17 18 19 20 21 22 23 24 25 26 27 28 29 #include <iostream> using namespace std;int main () int arr[2 ][3 ] = { {1 ,2 ,3 }, {4 ,5 ,6 } }; cout << "二维数组占用内存空间为:" <<sizeof (arr) << endl; cout << "二维数组第一行占用内存空间为:" << sizeof (arr[0 ]) << endl; cout << "二维数组每个元素占用内存空间为:" << sizeof (arr[0 ][0 ]) << endl; cout << "二维数组行数为:" << sizeof (arr)/ sizeof (arr[0 ]) << endl; cout << "二维数组列数为:" << sizeof (arr[0 ])/sizeof (arr[0 ][0 ]) << endl; cout << "二维数组的首地址为:" << arr << endl; cout << "二维数组的首地址为:" << (int )arr << endl; cout << "二维数组的第一行数据的首地址为:" << arr[0 ] << endl; cout << "二维数组的第一行数据的首地址(转为十进制)为:" << (int )arr[0 ] << endl; cout << "二维数组的第二行数据的首地址(转为十进制)为:" << (int )arr[1 ] << endl; cout << "二维数组的第一行第一个元素的地址为:" << &arr[0 ][0 ] << endl; cout << "二维数组的第一行第一个元素的地址为:" << &arr[0 ][1 ] << endl; cout << "二维数组的第一行第一个元素的地址为:" << (int )&arr[0 ][0 ] << endl; cout << "二维数组的第一行第一个元素的地址为:" << (int )&arr[0 ][1 ] << endl; system ("pause" ); return 0 ; }
运行结果:
5.3.3 二维数组应用案例
考试成绩统计 :
案例描述:有三名同学(张三,李四,王五),在一次考试中的成绩分别如下表,请分别输出三名同学的总成绩
语文
数学
英语
张三
100
100
100
李四
90
50
100
王五
60
70
80
示例:
1 2 3 4 5 6 7 8 9 10 11 12 13 14 15 16 17 18 19 20 21 22 23 24 25 26 27 28 29 30 31 32 33 34 #include <iostream> using namespace std;#include <string> int main () int scores[3 ][3 ] = { {100 ,100 ,100 }, {90 ,50 ,100 }, {60 ,70 ,80 } }; string names[3 ] = { "张三" ,"李四" ,"王五" }; int students[3 ]; cout << "所有学生的分数:" <<endl; for (int i = 0 ; i < 3 ; i++) { for (int j = 0 ; j < 3 ; j++) { cout << scores[i][j] << "\t" ; } cout << endl; } for (int i = 0 ; i < 3 ; i++) { students[i] = 0 ; for (int j = 0 ; j < 3 ; j++) { students[i] = students[i] + scores[i][j]; } } for (int i = 0 ; i < 3 ; i++) { cout <<names[i]<<" 的总分数:" << students[i] << endl; } system ("pause" ); return 0 ; }
6 函数
6.1 概述
作用 :将一段经常使用的代码封装起来,减少重复代码
一个较大的程序,一般分为若干个程序块,每个模块实现特定的功能。
6.2 函数的定义
函数的定义一般主要有5个步骤:
返回值类型
函数名
参数列表
函数体语句
return 表达式
语法 :
1
2
3
4
5
6
返回值类型 函数名 (参数列表) { 函数体语句 return 表达式 }
返回值类型:一个函数可以返回一个值,在函数定义中。
函数名:给函数起个名称。
参数列表:使用该函数时,传入的数据。
函数体语句:花括号内的代码,函数内需要执行的语句。
return 表达式:和返回值类型挂钩,函数执行完后,返回相应的数据。
6.3 函数的调用
功能 :使用定义好的函数
语法 :函数名(参数)
示例:
1 2 3 4 5 6 7 8 9 10 11 12 13 14 15 16 17 18 19 20 21 #include <iostream> using namespace std;int add (int num1, int num2) int main () int a, b, c; a = 1 ; b = 5 ; c = add (a, b); cout << "c = " << c << endl; system ("pause" ); return 0 ; } int add (int num1, int num2) int sum = num1 + num2; return sum; }
总结:函数定义里小括号内称为形参,函数调用时传入的参数成为实参。
6.4 值传递
所谓的值传递,就是函数调用时实参将数值传入给形参
值传递时,如果形参发生,并不会影响实参
示例 :
1 2 3 4 5 6 7 8 9 10 11 12 13 14 15 16 17 18 19 20 21 22 23 24 25 26 27 28 29 #include <iostream> using namespace std;void swap (int num1, int num2) cout << "交换前:" <<endl; cout << "num1 = " << num1 << endl; cout << "num2 = " << num2 << endl; int temp = num1; num1 = num2; num2 = temp; cout << "交换前:" << endl; cout << "num1 = " << num1 << endl; cout << "num2 = " << num2 << endl; } int main () int a, b, c; a = 1 ; b = 5 ; swap (a, b); system ("pause" ); return 0 ; }
总结:
如果函数不需要返回值,声明的时候可以写void;
当做值传递的时候,==函数的形参发生改变,并不会影响实参==;
6.5 函数的常见样式
常见的函数样式有4种
无参无返
有参无返
无参有返
有参有返
示例:
1 2 3 4 5 6 7 8 9 10 11 12 13 14 15 16 17 18 19 20 21 22 23 24 25 26 27 28 29 30 31 32 33 34 35 36 37 38 39 40 41 42 43 44 45 46 #include <iostream> using namespace std;void test01 () cout << "This is test01." << endl; } void test02 (int a) cout << "This is test02 a =" << a << endl; } int test03 () cout << "This is test03." << endl; int a = 100 ; return a; } int test04 (int a) cout << "This is test04. a =" << a << endl; int b = 10 *a; return b; } int main () int a = 5 ; int b, c; test01 (); test02 (a); b = test03 (); cout << "Test03 return value:" << b << endl; c = test04 (a); cout << "Test04 return value:" << c << endl; system ("pause" ); return 0 ; }
6.6 函数的声明
作用 :告诉编译器函数名称及如何调用函数。函数的实际主体可以单独定义。
示例:
1 2 3 4 5 6 7 8 9 10 11 12 13 14 15 16 17 18 19 #include <iostream> using namespace std;int max (int a, int b) int main () int num1 = 5 ; int num2 = 9 ; cout << "The max value of a and b: " << max (num1, num2) << endl; system ("pause" ); return 0 ; } int max (int a, int b) return a > b ? a : b; }
6.7 函数的分文件编写
作用 :让代码结构更加清晰
函数分文件编写一般有4个步骤
创建后缀名为.h的头文件
创建后缀名为.cpp的源文件
在头文件中写函数的声明
在源文件中写函数的定义
示例:
main.cpp
1 2 3 4 5 6 7 8 9 10 11 12 13 14 #include <iostream> using namespace std;#include "swap.h" int main () int num3 = 5 ; int num4 = 9 ; swap (num3, num4); system ("pause" ); return 0 ; }
swap.h
1 2 3 4 #include <iostream> using namespace std;void swap (int a, int b)
swap.cpp
1 2 3 4 5 6 7 8 9 #include "swap.h" void swap (int a, int b) int temp = a; a = b; b = temp; cout << "a = " << a << endl; cout << "b = " << b << endl; }
7 指针
7.1 指针的基本概念
指针的作用 :可以通过指针间接访问内存
内存编号时从0开始记录的,一般用十六进制数字表示
可以利用指针变量保存地址
7.2 指针变量的定义和使用
指针变量定义语法:数据类型 * 变量名
使用指针 :
通过解引用的方式来找到指针指向的内存;
指针前加*代表解引用,找到指针指向的内存中的数据。
示例:
1 2 3 4 5 6 7 8 9 10 11 12 13 14 15 16 17 18 #include <iostream> using namespace std;int main () int a = 5 ; int *p; p = &a; *p = 100 ; cout << "a的地址为:" << &a << endl; cout << "指针 p 为:" << p << endl; cout << "*p为:" << *p << endl; cout << "a为:" << a << endl; system ("pause" ); return 0 ; }
7.3 指针所占内存空间
在32位操作系统下,占用4个字节空间;在64位操作系统下,占用8个字节空间。
1 2 3 4 5 6 7 8 9 10 11 12 13 14 15 16 17 18 #include <iostream> using namespace std;int main () int a = 10 ; int * p = &a; cout << "sizeof(int *) = " << sizeof (int *) << endl; cout << "sizeof(int *) = " << sizeof (float *) << endl; cout << "sizeof(int *) = " << sizeof (double *) << endl; cout << "sizeof(int *) = " << sizeof (char *) << endl; system ("pause" ); return 0 ; }
7.4 空指针和野指针
空指针 :指针变量指向内存中编号位0的空间
用途 :初始化指针变量
注意 :空指针指向的内存时不可以访问的
示例1:空指针
1 2 3 4 5 6 7 8 9 10 11 12 13 14 #include <iostream> using namespace std;int main () int * p=NULL ; system ("pause" ); return 0 ; }
注意:
0~255之间的内存编号是系统占用的,因此不可以访问;
一开始不知道指向哪,先指向一个空。
野指针 :指针变量指向非法的空间
示例2:野指针
1 2 3 4 5 6 7 8 9 10 11 12 #include <iostream> using namespace std;int main () system ("pause" ); return 0 ; }
注意:16进制数可以通过int *强制转换成指针类型。
总结:==空指针和野指针都不是我们申请的空间,因此不要访问。==
7.5 const修饰指针
const修饰指针有三种情况:
const修饰指针 — 常量指针
const修饰常量 — 指针常量
const既修饰指针,又修饰常量
总结 :
常量指针 :
特点 :指针的指向可以修改,但是指针指向的值不可以改
*p = 20;:错误,指针指向的值不可以改
p = &b;:正确,指针的指向可以改
指针常量 :
特点 :指针的指向不可以更改,但是指针指向的值可以改
*p = 20;:正确,指针指向的值可以改
p = &b;:错误,指针的指向不可以改
const既修饰指针,又修饰常量 :
1 const int * const p = &a;
特点 :指针的指向和指针指向的值都不可以改
*p = 20;:错误,指针指向的值不可以改
p = &b;:错误,指针的指向不可以改
示例:
1 2 3 4 5 6 7 8 9 10 11 12 13 14 15 16 17 18 19 20 21 22 23 24 25 26 27 28 #include <iostream> using namespace std;int main () int a = 10 ; int b = 20 ; const int * p = &a; p = &b; cout << "*p的值为:" << *p << endl; int * const p2 = &a; *p2 = 15 ; cout << "*p2的值为:" << *p2 << endl; int * const p3 = &a; cout << "*p3的值为:" << *p3 << endl; system ("pause" ); return 0 ; }
技巧:看const右侧紧跟着的是指针还是常量,是指针就是常量指针,是常量就是指针常量。
7.6 指针和数组
作用 :利用指针访问数组中的元素
示例:
1 2 3 4 5 6 7 8 9 10 11 12 13 14 15 16 17 18 #include <iostream> using namespace std;int main () int arr[10 ] = { 1 ,2 ,3 ,4 ,5 ,6 ,7 ,8 ,9 ,10 }; cout << "数组中第一个元素为:" << arr[0 ] << endl; int * p = arr; cout << "利用指针来访问数组中第一个元素:" << *p << endl; cout << "利用指针来访问数组中第二个元素:" << *(p+1 ) << endl; p++; p++; cout << "利用指针来访问数组中第二个元素:" << *p << endl; system ("pause" ); return 0 ; }
7.7 指针和函数
作用 :利用指针作为函数参数,可以修改实参的值
示例:
1 2 3 4 5 6 7 8 9 10 11 12 13 14 15 16 17 18 19 20 21 22 23 24 25 26 #include <iostream> using namespace std;void swap02 (int * p1, int * p2) int temp = *p1; *p1 = *p2; *p2 = temp; cout << "swap02中的a = " << *p1 << endl; cout << "swap02中的b = " << *p2 << endl; } int main () int a = 10 ; int b = 20 ; cout << "a = " << a << endl; cout << "b = " << b << endl; swap02 (&a, &b); cout << "主函数中的a = " << a << endl; cout << "主函数中的b = " << b << endl; system ("pause" ); return 0 ; }
7.8 指针、数组、函数
案例描述:封装一个函数,利用冒泡排序,实现对整型数组的升序排列
例如数组:int arr[10]={4,3,6,9,1,2,10,8,7,5};
示例:
方法一:
main.cpp
1 2 3 4 5 6 7 8 9 10 11 12 13 14 15 16 17 18 #include <iostream> using namespace std;#include "bubble.h" int main () int arr[10 ] = { 4 ,3 ,6 ,9 ,1 ,2 ,10 ,8 ,7 ,5 }; int array_length; array_length = sizeof (arr) / sizeof (arr[0 ]); bubble (&arr[0 ], array_length); for (int i = 0 ; i < array_length; i++) cout << arr[i] << " " ; cout << endl; system ("pause" ); return 0 ; }
bubble.h
1 2 3 4 #include <iostream> using namespace std;void bubble (int * p, int arr_length)
bubble.cpp
1 2 3 4 5 6 7 8 9 10 11 12 13 14 #include "bubble.h" void bubble (int * p,int arr_length) int temp; for (int i = 0 ; i < arr_length - 1 ; i++) { for (int j = 0 ; j < arr_length - i - 1 ; j++) { if (*(p + j) > *(p + j + 1 )) { temp = *(p + j); *(p + j) = *(p + j + 1 ); *(p + j + 1 ) = temp; } } } }
方法二:
main.cpp
1 2 3 4 5 6 7 8 9 10 11 12 13 14 15 16 17 18 19 20 21 22 #include <iostream> using namespace std;#include "bubble.h" void printarray (int * arr, int arr_length) for (int i = 0 ; i < arr_length; i++) cout << arr[i] << " " ; cout << endl; } int main () int arr[10 ] = { 4 ,3 ,6 ,9 ,1 ,2 ,10 ,8 ,7 ,5 }; int array_length; array_length = sizeof (arr) / sizeof (arr[0 ]); bubble (arr, array_length); printarray (arr, array_length); system ("pause" ); return 0 ; }
bubble.h
1 2 3 4 #include <iostream> using namespace std;void bubble (int * p, int arr_length)
bubble.cpp
1 2 3 4 5 6 7 8 9 10 11 12 13 14 #include "bubble.h" void bubble (int * arr,int arr_length) int temp; for (int i = 0 ; i < arr_length - 1 ; i++) { for (int j = 0 ; j < arr_length - i - 1 ; j++) { if (arr[j] > arr[j + 1 ]) { temp = arr[j]; arr[j] = arr[j + 1 ]; arr[j + 1 ] = temp; } } } }
8 结构体
8.1 结构体基本概念
结构体术语用户自定义的数据类型,允许用户存储不同的数据类型
8.2 结构体定义和使用
语法 :struct 结构体名 { 结构体成员列表 };
通过结构体创建变量的方式有三种:
struct 结构体名 变量名
struct 结构体名 变量名 = { 成员1值 ,成员2值… }
定义结构体时顺便创建变量
示例:
1 2 3 4 5 6 7 8 9 10 11 12 13 14 15 16 17 18 19 20 21 22 23 24 25 26 27 28 29 30 31 32 #include <iostream> using namespace std;#include <string> struct Student { string name; int age; int score; }s3; int main () Student s1; s1.name = "张三" ; s1.age = 20 ; s1.score = 100 ; cout << "姓名:" << s1.name << " 年龄:" << s1.age << " 分数:" << s1.score << endl; struct Student s2 = { "李四" ,19 ,80 }; cout << "姓名:" << s2.name << " 年龄:" << s2.age << " 分数:" << s2.score << endl; s3.name = "王五" ; s3.age = 18 ; s3.score = 89 ; cout << "姓名:" << s3.name << " 年龄:" << s3.age << " 分数:" << s3.score << endl; system ("pause" ); return 0 ; }
总结:
定义结构体时的关键字是struct,不可省略;
创建结构体变量时,关键字struct可以省略;
结构体变量利用操作符“.”访问成员。
8.3 结构体数组
作用 :将自定义的结构体放入到数组中方便维护
语法 :struct 结构体名 数组名[元素个数] ={ {},{},...{} }
示例 :
1 2 3 4 5 6 7 8 9 10 11 12 13 14 15 16 17 18 19 20 21 22 23 24 25 26 27 #include <iostream> using namespace std;#include <string> struct Student { string name; int age; int score; }; int main () struct Student stuarray[3 ] = { {"张三" ,18 ,100 }, {"李四" ,19 ,96 }, {"王五" ,20 ,97 }, }; stuarray[2 ].name = "赵六" ; stuarray[2 ].age = 30 ; stuarray[2 ].score = 60 ; for (int i = 0 ; i < 3 ; i++) { cout << "姓名:" << stuarray[i].name << " 年龄:" << stuarray[i].age << " 分数:" << stuarray[i].score << endl; } system ("pause" ); return 0 ; }
8.4 结构体指针
作用 :通过指针访问结构体中的成员
示例:
1 2 3 4 5 6 7 8 9 10 11 12 13 14 15 16 17 18 19 20 21 #include <iostream> using namespace std;#include <string> struct Student { string name; int age; int score; }; int main () Student s= {"张三" ,18 ,100 }; Student* p = &s; cout << "姓名:" << p->name << " 年龄:" << p->age << " 分数:" << p->score << endl; system ("pause" ); return 0 ; }
总结:结构体指针可以通过->操作符来访问结构体中的成员。
8.5 结构体嵌套结构体
作用 :结构体中的成员可以是另一个结构体
例如:每个老师辅导一个学员,一个老师的结构体中,记录一个学生的结构体
示例:
1 2 3 4 5 6 7 8 9 10 11 12 13 14 15 16 17 18 19 20 21 22 23 24 25 26 27 28 29 30 31 32 33 34 #include <iostream> using namespace std;#include <string> struct Student { string name; int age; int score; }; struct teacher { int id; string name; int age; struct Student stu; }; int main () teacher t; t.id = 1000 ; t.name = "老王" ; t.age = 50 ; t.stu.name = "小王" ; t.stu.age = 20 ; t.stu.score = 100 ; cout << "老师姓名:" << t.name << " 年龄:" << t.age << " 老师id:" << t.id << endl; cout << "老师带的学生姓名:" << t.stu.name << " 学生年龄:" << t.stu.age << " 学生分数:" << t.stu.score << endl; system ("pause" ); return 0 ; }
总结:在结构体中可以定义另一个结构体作为成员,用来解决实际问题。
8.6 结构体做函数参数
作用 :将结构体作为参数向函数中传递
传递方式有两种:
值传递,不会修改主函数中的值。
地址传递,会修改主函数中的值。
示例:
1 2 3 4 5 6 7 8 9 10 11 12 13 14 15 16 17 18 19 20 21 22 23 24 25 26 27 28 29 30 31 32 33 34 #include <iostream> using namespace std;#include <string> struct Student { string name; int age; int score; }; void printdata (struct Student s) s.age = 30 ; cout << "通过函数访问结构体成员 姓名:" << s.name << " 年龄:" << s.age << " 分数:" << s.score << endl; } void printdata2 (struct Student* p) p->age = 45 ; cout << "通过指针访问结构体成员 姓名:" << p->name << " 年龄:" << p->age << " 分数:" << p->score << endl; } int main () Student s; s.name = "张三" ; s.age = 20 ; s.score = 100 ; printdata (s); printdata2 (&s); cout << "姓名:" << s.name << " 年龄:" << s.age << " 分数:" << s.score << endl; system ("pause" ); return 0 ; }
总结:如果不需要修改主函数中的数据,用值传递,否则用地址传递。
8.7 结构体中const使用场景
作用 :用const来防止误操作
示例:
1 2 3 4 5 6 7 8 9 10 11 12 13 14 15 16 17 18 19 20 21 22 23 24 25 #include <iostream> using namespace std;#include <string> struct Student { string name; int age; int score; }; void printdata (const Student* p) cout << "姓名:" << p->name << " 年龄:" << p->age << " 分数:" << p->score << endl; } int main () Student s = { "张三" , 20 , 100 }; printdata (&s); cout << "姓名:" << s.name << " 年龄:" << s.age << " 分数:" << s.score << endl; system ("pause" ); return 0 ; }
8.8 结构体案例
8.8.1 案例1
案例描述 :
学校正在做毕设项目,每名老师带领5个学生,总共有3名老师,需求如下:
设计学生和老师的结构体,其中在老师的结构体中,有老师姓名和一个存放5名学生的数组作为成员,学生的成员有姓名、考试分数,创建数组存放3名老师,通过函数给每个老师及所带的学生赋值,最终打印出老师数据以及老师所带的学生数据。
示例:
1 2 3 4 5 6 7 8 9 10 11 12 13 14 15 16 17 18 19 20 21 22 23 24 25 26 27 28 29 30 31 32 33 34 35 36 37 38 39 40 41 42 43 44 45 46 47 48 49 50 51 52 53 #include <iostream> using namespace std;#include <string> #include <ctime> struct student { string name; int score; }; struct teacher { string name; struct student stu[5 ]; }; void PrintInfo (struct teacher tea[], int len) for (int i = 0 ; i < len; i++) { cout << "老师姓名:" << tea[i].name << endl; for (int j = 0 ; j < 5 ; j++) { cout << "\t学生姓名:" << tea[i].stu[j].name << " 学生分数为:" << tea[i].stu[j].score << endl; } } } void inputdata (struct teacher p[], int len) string seeds = "ABCDE" ; for (int i = 0 ; i < len; i++) { p[i].name = "teacher_" ; p[i].name += seeds[i]; for (int j = 0 ; j < 5 ; j++) { p[i].stu[j].name = "student_" ; p[i].stu[j].name += seeds[j]; p[i].stu[j].score = rand () % 61 + 40 ; } } } int main () srand ((unsigned int )time (NULL )); int len; struct teacher tea[3 ]; len = sizeof (tea) / sizeof (tea[0 ]); inputdata (tea,len); PrintInfo (tea,len); system ("pause" ); return 0 ; }
8.8.2 案例2
案例描述:
通过冒泡排序的算法,将数组中的英雄按照年龄及进行升序排序,最终打印排序后的结果。
五名英雄信息如下:
1
2
3
4
5
{"刘备",23,"男"}, {"关羽",22,"男"}, {"张飞",20,"男"}, {"赵云",21,"男"}, {"貂蝉",19,"女"}
示例:
1 2 3 4 5 6 7 8 9 10 11 12 13 14 15 16 17 18 19 20 21 22 23 24 25 26 27 28 29 30 31 32 33 34 35 36 37 38 39 40 41 42 43 44 45 46 47 48 49 50 51 52 #include <iostream> using namespace std;#include <string> struct Hero { string name; int age; string sex; }; void bubble (struct Hero he[], int len) Hero temp; for (int i = 0 ; i < len - 1 ; i++) { for (int j = 0 ; j < len - i - 1 ; j++) { if (he[j].age > he[j + 1 ].age) { temp = he[j]; he[j] = he[j + 1 ]; he[j + 1 ] = temp; } } } } void PrintInfo (struct Hero he[], int len) cout << "根据年龄冒泡排序后的结果:" << endl; for (int i = 0 ; i < len; i++) { cout << "姓名:" << he[i].name << " 年龄:" << he[i].age << " 性别:" << he[i].sex << endl; } } int main () int len; struct Hero he[5 ] = { {"刘备" ,23 ,"男" }, {"关羽" ,22 ,"男" }, {"张飞" ,20 ,"男" }, {"赵云" ,21 ,"男" }, {"貂蝉" ,19 ,"女" } }; len = sizeof (he) / sizeof (he[0 ]); cout << "排序前的结果:" << endl; for (int i = 0 ; i < len; i++) { cout << "姓名:" << he[i].name << " 年龄:" << he[i].age << " 性别:" << he[i].sex << endl; } bubble (he, len); PrintInfo (he, len); system ("pause" ); return 0 ; }